If you've had some experience with 3D printing, you're likely familiar with STL and G-code files. The STL file is the most popular 3D printer file format, while G-code is a programming language used to control the movements of 3D printers and CNC (computer numerical control) machines. Converting STL to G-code is an essential process in the 3D printing workflow. This article discusses how to easily achieve the conversion from G-code to STL using the Cura slicer.
Articles related to file conversion:
What Is an STL File?
STL (Stereolithography) is a widely used file format in 3D printing and CAD (computer-aided design) systems. An STL File is utilized to store the data of a three-dimensional object, describing the geometry of the 3D model through a mesh of interconnected triangles. It can describe highly complex polyhedral models by adding more triangles to increase the resolution of the model, but this will also result in a larger file size. The importance of STL files is beyond doubt in 3D printing. Many CAD systems can readily generate files in the STL format, and nearly all 3D slicers support importing this file type. They are available on all 3D model websites like Thingiverse, Myminifactory, and Cults3d.
What Is a G-Code File?
G-code is a programming language that contains G-commands and M-commands. These commands control the precise actions or movements to create an object on a 3D printer and CNC machine. Currently, 3D printers only read G-code files, which contain extensive information about printing settings, including layer height, temperature, speed, motion paths, and so on.
Why Convert STL to G-Code?

Although STL files contain 3D model data like geometry, they cannot be directly used for printing as they do not represent the model's attributes such as color, texture, or other elements of the 3D model. To facilitate printing, a converter is required to transform the STL file into G-code. The most common, easiest, and free method is using 3D slicing software for this conversion.
The process of converting STL to G-code is easy. Typically, it only requires importing your STL file into the slicer, configuring the printing settings, and then let the software slice the 3D model into layers, ultimately outputting a G-code format file. This enables the printer to build the 3D object layer by layer, following the instructions provided in the G-code file.
How to Convert an STL File to G-Code in UltiMaker Cura
You don't need to write G-code yourself, as a 3D slicer can help you convert an STL file to a G-code file. Let's take Ultimaker Cura slicer as an example. It is a popular and free software that supports various file types such as STL, OBJ, X3D, 3MF, BMP, GIF, JPG, PNG... Following these four steps can easily generate a G-code file for 3D printing.
Step 1: Download Cura.
We are using Cura version 5.4 in this guide, and the latest version of Cura is available on the official website. It is compatible with Mac OS, Windows, and Linux systems. New versions will continue to be released by the Cura team. Keeping your Cura updated allows you to access more refined systems and new features, such as Ironing Top Layers, Vase Mode, and Fuzzy Skin, all of which are very useful functions.
Step 2: Configure Your 3D Printer.

Configure your printer settings by clicking on 'Settings' in the top menu bar in the Cura slicer, then 'Add your printer'. This allows the software to understand your printer's bed size, nozzle width, and other details. If your printer model is not listed among the options, you can add your printer information under 'Custom FFF printer'.
Step 3: Import 3D Model STL File.

Once you've configured your printer, you can begin uploading your STL file. Here're two methods for you:
- Method 1: At the top of the menu click 'File' >> 'Open File'.
- Method 2: Drag the STL file directly from your desktop into the 'PREPARE' interface of the slicer.
Step 4: Slice and Convert STL File in G-Code.

This step is crucial in converting the STL file to G-code. In the 'Print settings' section, there are numerous parameters for adjustment, but don't be overwhelmed by this very long list of settings. Typically, you only need to fine-tune a few of them based on the default value.
Anycubic provides recommended Cura material profiles of different filaments for their 3D printers. Usually, you just need to import the corresponding profile into the slicer. Then, based on your preferences, you can adjust the settings like changing the layer height, scaling the STL file, adding supports (e.g. tree structure). Finally, click the 'Slice' button, and the system will automatically calculate and generate the G-code for you.
How to 3D Print G-code File
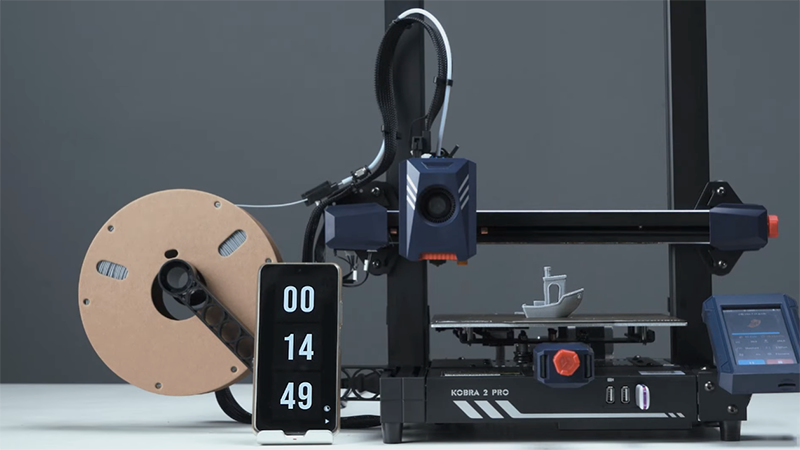
From downloading an STL file, converting it into G-code format, to transferring it to your printer, the final step of your 3D printing workflow is turning on your 3D printer. Having a reliable printer can make this last step easy and stable. If you're considering upgrading your old printer, Anycubic's Kobra 2 Pro is a worthwhile investment. Its modular design, auto-leveling, and smart Z-offset adjustment enable a quick start for your first print. Moreover, with a maximum speed of 500mm/s and acceleration of 20,000mm/s², you can create a standard test 3DBenchy in just 15 minutes. Lastly, the Anycubic APP and firmware upgrades enhance your printing experience, making it more intelligent.