Anycubic Kobra 2 features LeviQ 2.0 system, which combines automatic bed leveling and smart Z-offset functionality. If you experience leveling issues like low leveling precision during the initial setup of Kobra 2, it is possible that certain components such as V-slot wheels, bearing wheels, belts, and wire connectors may have loosened during shipping. Typically, these issues can be resolved by tightening the components with a wrench. However, before making any adjustments, ensure that the printer is placed on a clean and level platform to guarantee accurate calibration. This article will provide you with a step-by-step guide on performing pre-leveling checks and how to level and calibrate Anycubic Kobra 2.
Tools You Need:

- Wrench*1
- Zip ties or clips
Step 1:Tighten V-Slot Wheels on the Z-axis

Start Kobra 2, and raise the Z-axis for easier adjustments. Use your hand to move the inner rubber V-slot wheels on both sides of the Z-axis frame to check if they are loose. Due to the application of eccentric spacers, they can only be tightened at a specific position. If you notice any looseness, use a wrench to tighten the hex eccentric spacers that secure the inner wheels. It's important to note that make slight adjustments when adjusting the hex eccentric spacers.
Step 2:Tighten Steel Bearing Wheels on the X-axis

The X-axis of Kobra 2 utilizes durable and scratch-resistant SG15 steel bearing wheels, which can prolong the machine’s lift span. Use your hand to gently slide the print head module from side to side to check for any looseness. If there is any issue, tighten the hex eccentric spacer of the lower wheel with a wrench. Adjust it until the print head moves smoothly without significant looseness.
Step 3:Tighten Steel Bearing Wheels on the Y-axis

Just like in step 2, this step is to slide the hotbed from side to side to inspect for any looseness or excessive tightness. If there is an issue, use a wrench to adjust the hex eccentric spacers that secure the two right wheels under the bed. Make adjustments until there is no noticeable looseness when shaking and sliding the hotbed along the rail.
Step 4:Tighten Belts on the X and Y-Axes
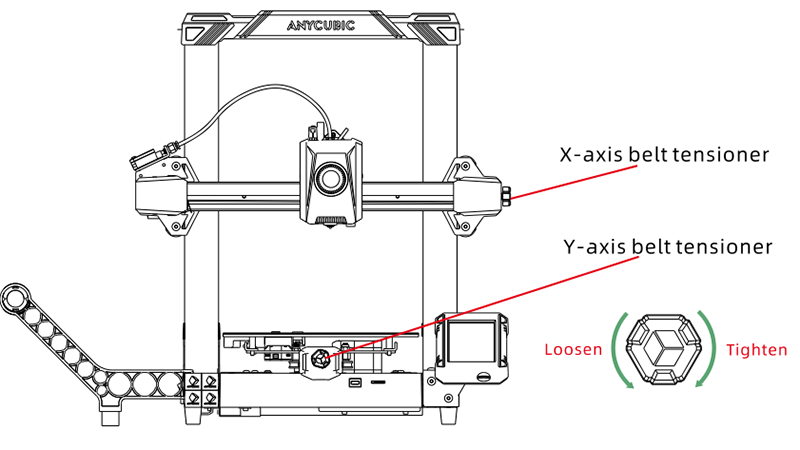
Poor belt tension can result in low precision printing. Belts are distributed on both the X and Y axes, and you can adjust their tension by rotating the belt tensioners. If you are unsure about the appropriate tightness for the belts of Kobra 2, it is recommended to rotate the X and Y axes tensioner knobs clockwise until they are fully tightened, and then rotate them counterclockwise one full turn, which is the optimal tightness for the belts.
Step 5:Check If Printer Wires Are Properly Connected

Check if the wires of various modules on the printer are properly plugged in, such as the filament runout sensor, motor steppers on the X and Z axes, limit switch, and print head. Especially pay attention to the cables around the print head that should be neatly organized to prevent them from getting caught in the moving rails during printing. Use clips and zip ties to secure these cables along with the filament tube, ensuring they do not interfere with the printer's moving parts during printing.
Step 6:Calibrate Nozzle Position

Shipping can sometimes cause components of the 3D printer to become loose, resulting in leveling issues. To prevent this, not only tighten the parts, but also manually calibrate the position of the nozzle. Follow these steps to calibrate the nozzle through the printer's screen:
- On the main interface, click "Prepare" >> "Leveling" >> "Module calibration" >> "Position calibration".
- The machine's axes will return to the home position, and the print head will automatically probe and stop near the calibration module.
- Use the screen controlling the X and Y axes, and move the nozzle at the center of the module calibration.
- Click the "Save" button on the screen to save the settings.
Step 7:Run Auto-Leveling

All the previous steps are to ensure precise automatic bed leveling. Before leveling, make sure the PEI building sheet is properly placed on the hotbed, as the leveling sensor can only detect metal surfaces. To initiate the auto-leveling function through the printer's screen and follow the path: Click "Prepare" >> "Leveling" >> "Auto-leveling".
Step 8:Have a Leveling Test

Kobra 2 features a smart Z-offset function that automatically adjusts the offset on the Z-axis without the need for manual adjustments. However, after auto-leveling during the initial setup of Kobra 2, it is necessary to manually calibrate the Z-offset due to the imprecision caused by shipping. To do this, feed the filament and perform a test using the provided leveling test G-code file in the TF card. Alternatively, you can download the test file on the official website. This test ensures that the first layer adheres perfectly to the build plate.